Screenshots
This page helps you take your first capture, make a quick change, and save the result.
First-Time Setup
- Open Print Screen Deluxe.
- On first visible startup, the app shows a message that tells you which hotkey to press to capture your screen.
- If you do not want to see that message again, turn on
Do not show this againand clickOK. - In the left setup panel, click
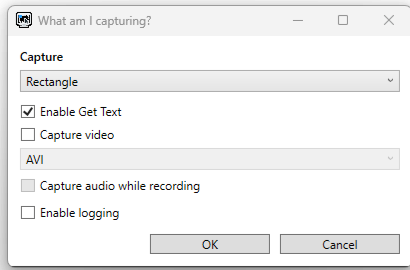
What am I capturing?. - Pick
FullScreenfor your first test. - Leave
Enable Get TextandCapture videooff for now. - Click
OK.
Choose How To Start A Capture
- Click
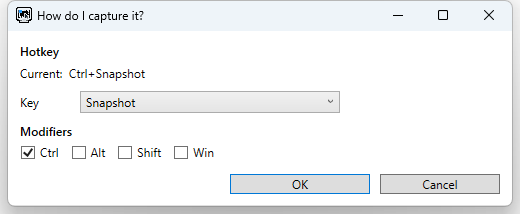
How do I capture it?. - Check the current hotkey.
- The current default hotkey is
Ctrl+PrintScreen. - If you want a different shortcut, click in the shortcut box and press the keys you want to use.
- Click
OK.
Choose What Happens After Capture
- Click
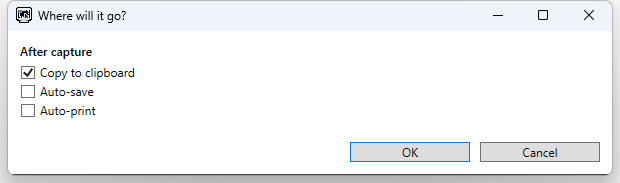
Where will it go?. - If you want the capture to open in the app, leave the checkboxes off.
- Turn on
Copy to clipboardif you want to paste the result into email, chat, or a document. - Turn on
Auto-saveif you want the app to save each capture to a folder. - Turn on
Auto-printif you want the app to send each capture to a printer. - Click
OK.
Check A Few Helpful Options
- Click
Options. - Open the
Capturetab. - Turn on
Include mouse cursorif you want the pointer in the picture. - Open the
Generaltab and leaveAutomatically pop up main window when you captureturned on if you want each capture to come forward in the app. - Turn on
Show Quick Capture Buttonif you want the floating capture button. It temporarily hides during a full-screen PowerPoint slide show and reappears afterward. - Turn on
Use Time Delayif you need a short pause before capture starts. - Click
OK.
Take Your First Capture
- Press the shortcut shown under
How do I capture it?. - If the Quick Capture button is visible, you can click it instead.
- For
Full Screen, the app captures the screen right away. - The result opens in a new tab in the main window.
If You Pick Another Capture Type
Active Windowcaptures the window that is active right now.Window Clicklets you click the window you want.Rectangle,Round Rectangle,Ellipse,Triangle,Polygon, andFreehandlet you mark the area you want.Menuhelps you capture a menu that is open on the screen.Clipboardcreates a new item from the picture already stored in the clipboard.Auto Scrollis for long pages, long documents, and other content that does not fit on one screen.
Make A Quick Edit
- Select the new image tab.
- Open the
Edit Imagetab. - Try one of these simple tools:
- Click
Cropto keep only the part you want. - Click
Highlightto draw attention to an area. - Click
Arrowto point to something important. - Click
Textto place a note on the image. - Use
Undoif you want to step back.
Save, Copy, Or Print
- Open the
Filetab. - Click
Saveif the image already has a file path. - Click
Save Asif you want to choose the name or folder. - Click
Copyif you want to paste the image somewhere else. - Click
Printif you want a print preview first.
Common First Setups
Capture Only The Active Window
- Click
What am I capturing?. - Change
CapturetoActive Window. - Click
OK. - Press the hotkey while the window you want is active.
Save Every Capture Automatically
- Click
Where will it go?. - Turn on
Auto-save. - Choose the folder, format, and naming style.
- Click
OK.
Find Logs For Support
Logging is always on. If you need to troubleshoot a problem later, check %APPDATA%\PrintScreenDeluxe\psd-YYYY-MM-DD.log.
If Something Does Not Look Right
- If the screen area is hard to see while you select it, change
Selection overlay darkness (%)inOptions>Capture. - If MP4 video is not available, use AVI or install the Windows Media Feature Pack on Windows N systems.
Next Step
Read Print Screen Deluxe Overview for a quick tour.
Then read Capture Screens In Print Screen Deluxe, Edit Images And Add Markup, and Save, Copy, And Print. When you are ready for OCR, video, or timed jobs, use Get Text (OCR), Video Recording, and Scheduled Capture And Workflow.