This page explains how to keep your work, copy it to the clipboard, open saved files, and print from Print Screen Deluxe.
Open An Existing Image
Use the File tab when you want to open or import a picture.
Open A File
- Open the
Filetab. - Click
Open.... - Pick the image file you want.
The image opens in a new tab.
Open A Recent File
- Open the
Filetab. - Click
Recent. - Pick the file you want from the list.
The app keeps a recent-file list for quick access.
Import From A Scanner Or Camera
- Open the
Filetab. - Click
Acquire.... - Follow the scanner or camera steps.
This brings the imported image into a new tab.
Save Your Work
Save
Click Save when the image already has a file name and folder.
- If the image came from an existing file,
Saveupdates that file. - If the image is new and has never been saved,
Saveopens the Save As step.
Save As
Click Save As when you want a new file name, a new folder, or a new file type.
- Open the
Filetab. - Click
Save As. - Pick the folder and file name.
- Finish the save.
Print Screen Deluxe uses the file extension to decide the save format.
Supported Save Types
You can save images in these file types:
- PNG
- JPG
- BMP
- GIF
- TIFF
What Gets Saved
When you save an image, Print Screen Deluxe saves the edited result.
That includes:
- the current image
- your markup
- your crop, cut, resize, rotate, shear, shadow, and corner changes
Copy To The Clipboard
Copy From The File Tab
The Copy button on the File tab copies the full image.
Use this when you want to paste the whole result into another program.
Copy From The Edit Image Tab
The Copy button on the Edit Image tab is smarter.
- If you drew a selection box, it copies only that selected area.
- If there is no selection box, it copies the whole image.
This is useful when you want only one part of the picture.
Paste From The Clipboard
The ribbon Paste command creates a new image document from the clipboard picture.
- Copy an image from another app.
- Go to Print Screen Deluxe.
- Click
Pasteon theFiletab, or use thePastebutton on theEdit Imagetab.
The pasted image opens in a new tab.
If the clipboard does not hold an image, the app tells you that there is no image to paste.
Print Your Image
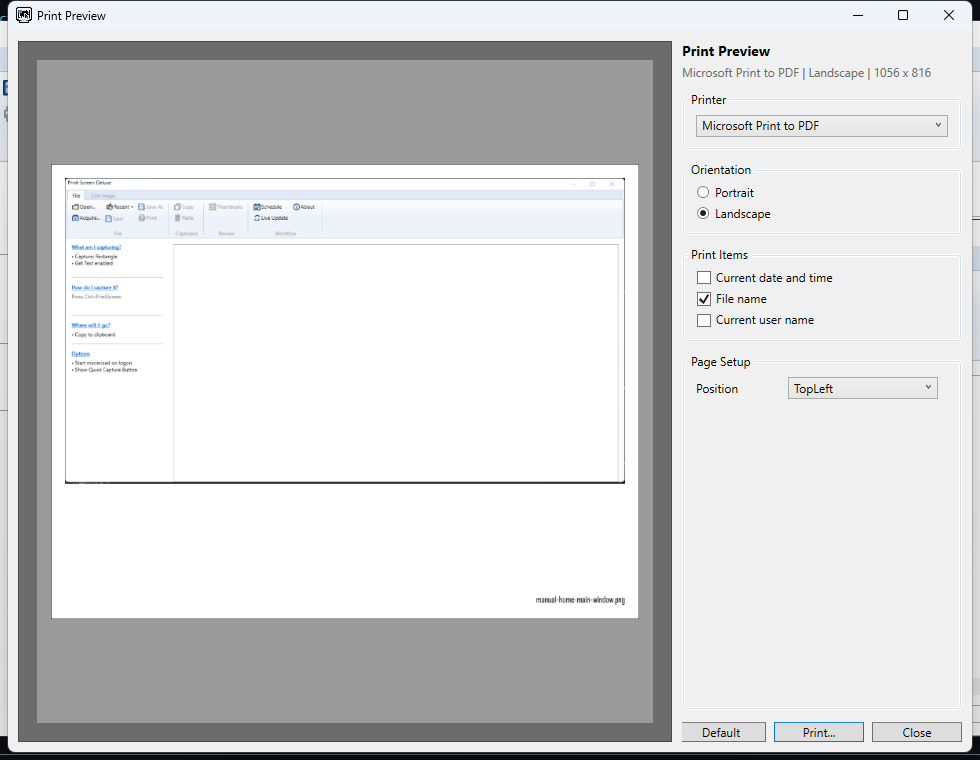
The Print button on the File tab opens Print Preview.
- Select the image tab you want to print.
- Open the
Filetab. - Click
Print. - Review the page in the preview window.
- Click
Print...when you are ready.
Use Print Preview
Print Preview helps you check the result before it goes to the printer.
Printer
Use the Printer box to pick the printer.
Orientation
Choose:
PortraitLandscape
Print Items
You can choose whether to add these details to the printout:
- current date and time
- file name
- current user name
Page Setup
Use Position to pick where the image sits on the page.
Buttons In Print Preview
Defaultrestores your saved print settings.Print...sends the job to the selected printer.Closeleaves the preview without printing.
Print Settings That Come From Options
Some print settings are not changed inside Print Preview. They come from Options > Printing.
These include:
Print scale (%)Auto-lighten printoutPrinter fontFont size
If you want to change those settings, open Options and use the Printing tab first.
Save And Print Automatically After Capture
Use Where will it go? when you want the app to do work for you after each capture.
Auto-Save
Turn on Auto-save when you want the app to save each capture on its own.
You can choose:
- the folder
- the file type
- whether names are automatic
- whether you want to name each file yourself
The default auto-save folder is %Pictures%\PrintScreenDeluxe.
If you want the same save steps to happen on a timer, see Scheduled Capture And Workflow.
Auto-Name Files
If Auto-name files is on, the app creates names like PS0000.png.
The counter goes up with each file. You can reset the counter in the setup dialog.
Auto-Print
Turn on Auto-print when you want each capture to go to a printer after capture.
Pick the printer in Where will it go?.
Unsaved Changes
If you close an edited image before saving it, the app asks if you want to save changes first.
- Choose
Yesto save. - Choose
Noto close without saving. - Choose
Cancelto keep the image open.
The same kind of warning appears when you exit the app with unsaved image changes.
Helpful Tips
- Use
Save Asthe first time you keep a new capture. - Use the
Edit ImagetabCopybutton when you want only a selected area. - Use
Print Previewbefore printing marked-up images. - Set auto-save and auto-print only when you need the same workflow over and over.
Next Step
Read Edit Images And Add Markup if you want to change the image first.
Read Scheduled Capture And Workflow if you want auto-save or auto-print on a timer. Read Troubleshooting And FAQ if save, paste, or print is not working the way you expect.