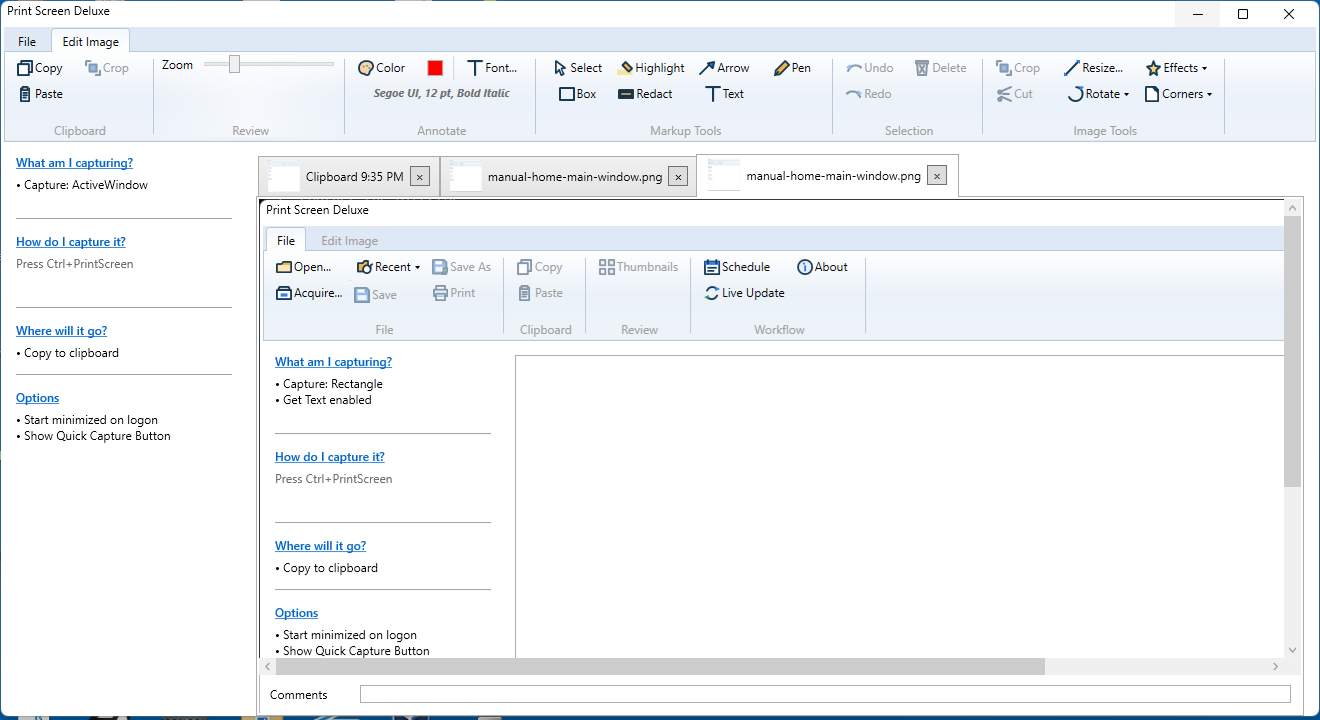
This page explains how to change a capture after it opens in Print Screen Deluxe.
Before You Edit
- Capture an image or open one from a file.
- Select the image tab you want to work on.
- Open the
Edit Imagetab.
The tools on this tab work on the current image.
Move Around The Image
You can zoom in or out before you edit.
- Use the
Zoomslider on theEdit Imagetab. - You can also hold
Ctrland turn the mouse wheel.
Zoom helps when you need to place markup on a small part of the image.
Two Different Select Tools
Print Screen Deluxe uses two tools with similar names.
| Tool | What it is for |
|---|---|
Select |
Picks existing markup so you can move it or delete it. |
Select Area |
Draws a selection box on the image for Crop or Cut. |
Use Select Area when you want to crop or cut part of the image. Use Select when you want to work with markup that is already on the image.
Change Color And Text Style
The Annotate group controls how new markup looks.
Colorchanges the color for new markup.- The color swatch opens the same color picker.
Font...changes the font, size, bold, and italic settings for text markup.
If a text annotation is selected, the font settings also apply to that text.
Add Markup
Box
Use Box to draw a rectangle outline.
- Click
Box. - Drag over the image.
- Release the mouse button.
Highlight
Use Highlight to draw a see-through colored box.
- Click
Highlight. - Drag over the area you want to call out.
- Release the mouse button.
Redact
Use Redact to cover part of the image with a black box.
- Click
Redact. - Drag over the content you want to hide.
- Release the mouse button.
Arrow
Use Arrow to point at something.
- Click
Arrow. - Drag from the start point to the end point.
- Release the mouse button.
Text
Use Text to place a note on the image.
- Click
Text. - Click where you want the text to start.
- Type your note.
- Press
Enterto finish.
You can also click somewhere else to finish. Press Esc to cancel while you are still editing the new text.
Pen
Use Pen for freehand drawing.
- Click
Pen. - Draw over the image.
- Release the mouse button.
What Happens After You Draw
After you finish a markup stroke, Print Screen Deluxe switches back to Select mode.
That makes it easy to:
- click the markup you just made
- move it to a better spot
- delete it if you changed your mind
Select And Move Existing Markup
- Click
Select. - Click the markup item you want.
- Drag it to a new place.
You can move boxes, highlights, redactions, arrows, text, and pen lines.
Delete Markup
- Click the markup item so it is selected.
- Click
Deletein theSelectiongroup.
You can also press the Delete key.
Undo And Redo
Use these when you want to step backward or forward through changes.
- Click
Undoto reverse the last change. - Click
Redoto bring back a change you just undid. - You can also use
Ctrl+Zfor undo. - You can also use
Ctrl+Yfor redo.
Undo and redo work for image changes and markup changes.
Crop Part Of The Image
Use crop when you want to keep only one part of the image.
- Click
Select Area. - Drag a box over the area you want to keep.
- Click
Crop.
You can use the Crop button in either the Clipboard group or the Image Tools group. Both buttons do the same job.
Crop removes everything outside the selection.
Cut Part Of The Image
Use cut when you want to remove part of the image and also copy that part to the clipboard.
- Click
Select Area. - Drag a box over the area you want to remove.
- Click
Cut.
The selected area is copied to the clipboard, and that area is cleared from the image.
Resize The Image
Use Resize... when you want a smaller or larger image.
- Click
Resize.... - Enter a new width or height.
- Leave
Keep aspect ratioon if you want the image to stay in the same shape. - Use the quick size buttons if you want
25%,50%,100%, or200%. - Click
OK.
Rotate The Image
You have two ways to rotate.
Quick Rotation
Use the Rotate menu for common turns.
Left 90Right 90180
Custom Rotation
Use Rotate > Custom... when you want another angle.
- Open
Rotate > Custom.... - Drag the slider to preview the angle.
- Use the quick rotate buttons if you want.
- Click
Apply.
Add Effects
Shear
Use Effects > Shear... to slant the image.
Horizontalchanges the left-right slant.Verticalchanges the up-down slant.- Values such as
0.15or-0.15work well for small changes.
Shadow
Use Effects > Shadow... to add a drop shadow.
Opacity %controls how dark the shadow looks.Blur Radiuscontrols how soft the shadow looks.Directioncontrols where the shadow falls.Depthcontrols how far the shadow sits from the image.
Change The Corners
Use the Corners menu when you want the image to look clipped or torn.
You can choose:
Cut Top LeftCut Top RightCut Bottom LeftCut Bottom RightTear Top LeftTear Top RightTear Bottom LeftTear Bottom Right
These actions apply right away.
Copy While You Edit
The Copy button on the Edit Image tab is smart.
- If you have a selection box, it copies just that selected part.
- If you do not have a selection box, it copies the whole edited image.
Tips For Better Results
- Zoom in before you place small arrows or text.
- Use
Highlightwhen you want the image to stay readable. - Use
Redactwhen the content must be hidden. - Use
Select Areafor crop and cut jobs. - Use
Selectwhen you want to move or delete markup.
Next Step
Read Save, Copy, And Print to learn how to keep, share, and print your edited image.